Wow, thats a lot of links gathered, good job
I notice you also added a link to my cabinet blog entry - i'm glad its helpful")
Yes it is indeed helpful. Actually i like your result best. I like the small panel you did although i would like to put an solarcell on top of the boominator (one of those 15W panels) so i need to make the same panel you did on the back or the front. I don't know whether that is a good idea or if it is doable since there are holes in the front and in the back.
Last edited:
My questions about the Boominator :
I am planning to build Boominator mark II. I have ordered all the parts besides the solar panel.
Here is a list of what I will eventually have :
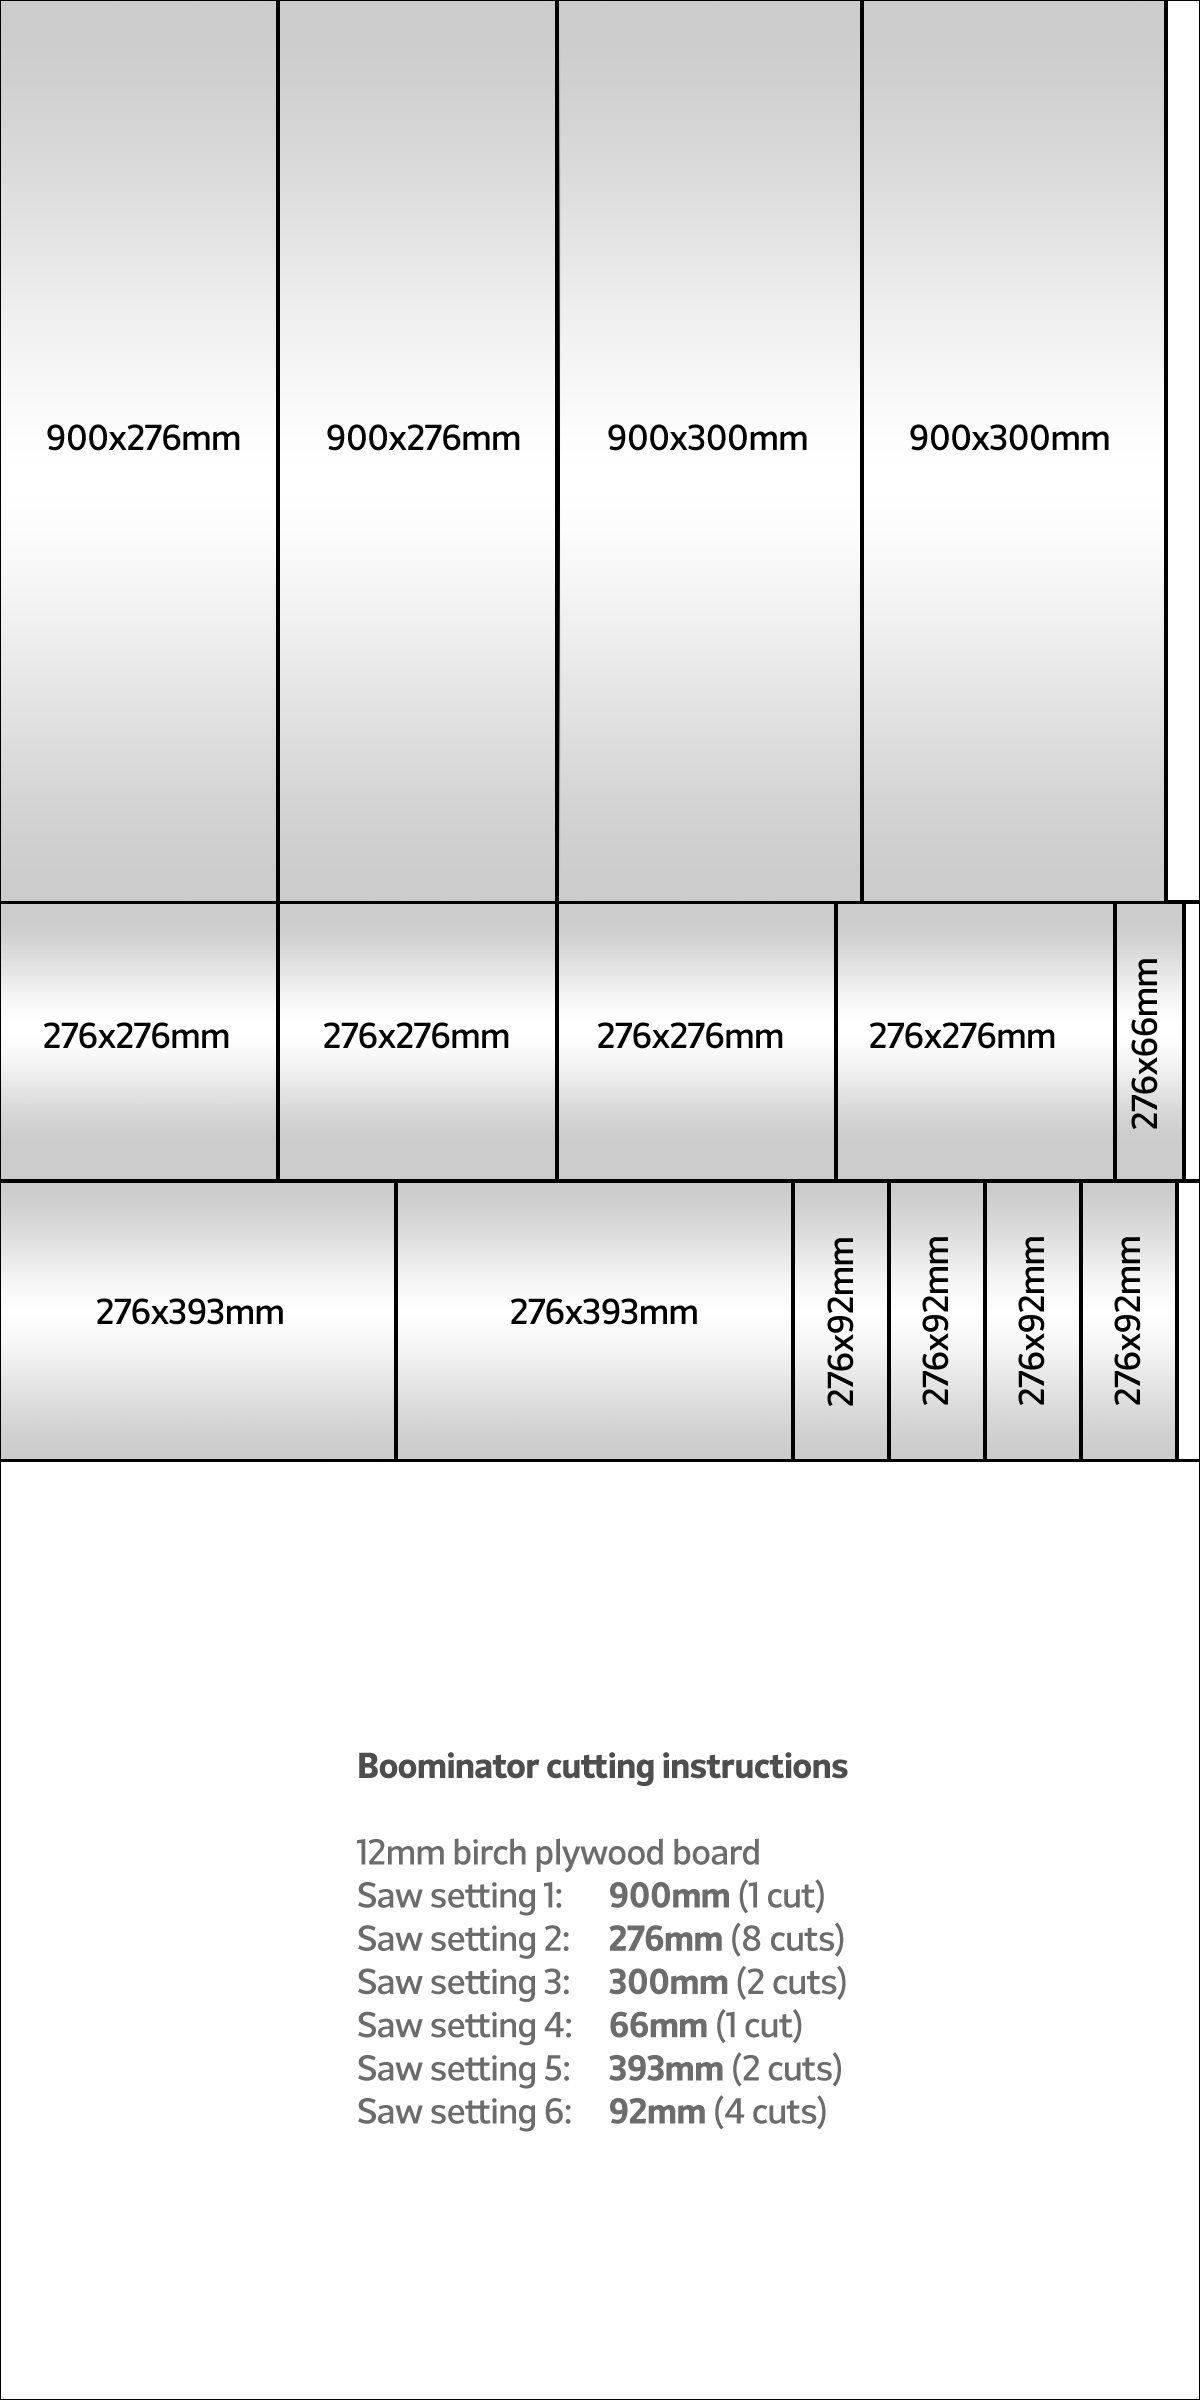
I found some cutting instructions here made by an user:
http://www.diyaudio.com/forums/atta...b-ultimate-party-machine-boominator_cuts2.png
I am planning to build Boominator mark II. I have ordered all the parts besides the solar panel.
Here is a list of what I will eventually have :
- 4 x HP10w
- 4 x MPT-001 unless somebody has other ideas what to use1 x amp6basic
- 2 x Varta 6.6 Ah / 98 Wh / Lithium-Ion (paralleled since they are exactly same cells), i know you are not suppose to parallel Lithium Ion batteries but i have checked with a battery specialist and i got the answer that yes you can if they are exactly the same.
I found some cutting instructions here made by an user:
http://www.diyaudio.com/forums/atta...b-ultimate-party-machine-boominator_cuts2.png
- Can someone that these are exactly the correct dimensions that the Boominator was intended for ?
- If the answer for 1 is yes then I have following questions:
- I guess the parts 276x276mm are the sides of the case and the two internal parts for the middle compartment ?
- The two 276x393mm are the braces ? If so any size where to cut the circles and where they need to be ? How many ? How big ? Should there be a big circle in the center where the HP10W should meet or should the HP10W be clued to the brace ? I am confused.
- Are there any guides where exactly to place the holes for HP10W or it does not really matter as long as they aligned and the case has the correct dimensions ?
- Should everything be cut in 12mm plywood ? In this post (http://www.diyaudio.com/forums/clas...ab-ultimate-party-machine-51.html#post2102290) I see Saturnus write that the bracing should be 8mm but in another post he says 12mm, what have you guys used ?
- As I can see the original design I mean Boominator 1 or whatever it was called it was made by Saturnus to have two solarpanels on top. The last one meaning Boominator mark II was designed to have a big solarpanel on top so I have settled on this : Accubescherming op Zonne-energie 15W - Accu beveiliging & onderhoud - Conrad Electronic where I will be striping the case and then it should fit if the case is 300x300x900mm according to Saturnus. I guess I have to use the router to create room on top to create space for it as in sinking the panel into the wood correct?
- I would like to make room for some buttons and plugs. Since the solar panel will take all the space on top where would it be a good idea to put these?
- I would like to have an option to get to the middle compartment something like phaedras did in his design but again that depends on 4 since I cannot put it on the top.
- How do cables go from the middle compartment to the speaker compartment? Are there holes drilled and then sealed? I see Saturnus explaining something about this here (http://www.diyaudio.com/forums/clas...ab-ultimate-party-machine-20.html#post1679589 and here http://www.diyaudio.com/forums/clas...ab-ultimate-party-machine-90.html#post2493520 or actually it’s about the access hole made) but I still don’t get it because I don’t see where cables go.
- How have people fixed their equipment/batteries in the middle compartment?
- Would it be a good idea to do what Saturnus did which is create a opening in the bottom with a hinge so I can access the equipment then create small hole for the plugs on the back or the front ? I am planning to install Turnigy Wattmeter to readout the power consumption while playing (HobbyKing Online R/C Hobby Store : Turnigy 130A Watt Meter and Power Analyzer).
- What kind of wood have you used? I mean I know it has to be plywood 12mm and I am also planning on using that but there are different kinds. I can add that I would like to paint it if that makes a difference. I found these Krydsfiner and Krydsfinér . Would be helpful if someone could point out which are the best and then the second best according to quality vs price.
1. Yes, that is the correct panel dimensions for the more easily built mark II version. The original had interlocking grooves but that's practically impossible to make accurate without a CNC router so I dropped it to make it easier to build for people without access to such machinery.
2.1 Correct
2.2 It's basically up to you how you want your holes in the centerbrace to be. The general rule though is that more and smaller holes give better midrange performance but observe that you don't cut/drill out too many hole so rigidity is compromised as that affects bass performance, and remember that all holes should have rounded edges so if you cut many holes that can take a long time to do. It's also up to you if you do it the easy way and just glue to magnets on the centerbrace or you do it the difficult way and glue the magnets together through a hole in the centerbrace and insert masonite between the drivers and the cabinet side. The latter will give the best result but the difference is minimal. Just make sure that the drivers are firmly glue to both the centerbrace and the cabinet walls
2.3 It will give the best result if you follow the sketch-up drawing exactly. That also means the piezo should be in the middle, not in the top corner as many do.
2.4 If you have no problem with ordering different thicknesses of plywood then 8-9mm plywood for the centerbrace is the best. Just remember that it also eliminates the easy-building process of being able to glue the magnets on the centerbrace. For that to work, it must be 12mm.
2.5 That panel will no longer fit on top. They have changed the dimensions on the raw panel I'm afraid.
2.6 Inside the electronics compartment (more specifically in the top of the electronics compartment) but accessible through the venting holes would be my choice
2.7 Skipped this one
2.8 Drilled and sealed, yes, that's the easiest way. Alternatively you can make proper speaker connectors.
2.9 no idea, but I'm guessing pretty much everyone
2.10 I suggest you do make the electronic compartment only accessible from the bottom, yes. That way no one but yourself and maybe a few others will figure out how to access the delicate electronics. Also having the hole on the bottom will ensure that accidentally spilled beer or rain coming into the electronics compartment through the access/venting holes will drain out harmlessly. How you figure you'll do it and fit everything you need is up to you
2.11 Any plywood with minimum 7 ply would be second choice, less than 7 ply should not be considered unless you're on a really tight budget or just simply can't get anything else. The absolute best while still being cost friendly is 9 ply birch plywood. If it matters, I also recommend the filmed version.
Last edited:
Would you mind if I posted your list of links on the Boominator page on facebook? That way it won't get lost in the pages here?
Would you mind if I posted your list of links on the Boominator page on facebook? That way it won't get lost in the pages here?
Just remember to include a disclaimer saying that some of the advices might be outdated due to the product in question is no longer available or has changed dimensions, so they should check the latest updates and advice here.
Would you mind if I posted your list of links on the Boominator page on facebook? That way it won't get lost in the pages here?
Not at all, it would be cool if it's editable so i or we can add more stuff to it.
1. Yes, that is the correct panel dimensions for the more easily built mark II version. The original had interlocking grooves but that's practically impossible to make accurate without a CNC router so I dropped it to make it easier to build for people without access to such machinery.
2.1 Correct
2.2 It's basically up to you how you want your holes in the centerbrace to be. The general rule though is that more and smaller holes give better midrange performance but observe that you don't cut/drill out too many hole so rigidity is compromised as that affects bass performance, and remember that all holes should have rounded edges so if you cut many holes that can take a long time to do. It's also up to you if you do it the easy way and just glue to magnets on the centerbrace or you do it the difficult way and glue the magnets together through a hole in the centerbrace and insert masonite between the drivers and the cabinet side. The latter will give the best result but the difference is minimal. Just make sure that the drivers are firmly glue to both the centerbrace and the cabinet walls
Great thanks. I pressume you mean the edges should be made round with sandpaper or something simmilar right ?
2.3 It will give the best result if you follow the sketch-up drawing exactly. That also means the piezo should be in the middle, not in the top corner as many do.
Will do!
2.4 If you have no problem with ordering different thicknesses of plywood then 8-9mm plywood for the centerbrace is the best. Just remember that it also eliminates the easy-building process of being able to glue the magnets on the centerbrace. For that to work, it must be 12mm.
I'll probably go with 12mm making it easier for me.
2.5 That panel will no longer fit on top. They have changed the dimensions on the raw panel I'm afraid.
Can you recommend another one ? The price was quite good on it.
2.6 Inside the electronics compartment (more specifically in the top of the electronics compartment) but accessible through the venting holes would be my choice
Not sure what you mean. Are there two different compartments in the center ? I thought there was only one. So you recommend putting buttons in one of the venting holes which means covering it up. Is this what you mean ?
An externally hosted image should be here but it was not working when we last tested it.
2.7 Skipped this one
2.8 Drilled and sealed, yes, that's the easiest way. Alternatively you can make proper speaker connectors.
Cool, probably the speaker connectors are the best idea. Shouldn't the speaker connectors be sealed in a way ? If so with what ?
2.9 no idea, but I'm guessing pretty much everyone
2.10 I suggest you do make the electronic compartment only accessible from the bottom, yes. That way no one but yourself and maybe a few others will figure out how to access the delicate electronics. Also having the hole on the bottom will ensure that accidentally spilled beer or rain coming into the electronics compartment through the access/venting holes will drain out harmlessly. How you figure you'll do it and fit everything you need is up to you
As i wrote in 2.6 i am not sure how the compartment was designed. When i look at the Google Sketck it looks like the middle compartment is one big compartment. If that is so then all electronics and batteries will be in this compartment. I was thinking to screw/glue the electronics to the plywood in this compartment so when/if water or liquids get's in they will get out in the bottom.
2.11 Any plywood with minimum 7 ply would be second choice, less than 7 ply should not be considered unless you're on a really tight budget or just simply can't get anything else. The absolute best while still being cost friendly is 9 ply birch plywood. If it matters, I also recommend the filmed version.
So when you say 9 ply plywood it's actually 9mm birch plywood right ? If this is correct then it would mess up the cutting instructions before or i have to change them accordingly when using 9mm.
2.2 It's basically up to you how you want your holes in the centerbrace to be. The general rule though is that more and smaller holes give better midrange performance but observe that you don't cut/drill out too many hole so rigidity is compromised as that affects bass performance, and remember that all holes should have rounded edges so if you cut many holes that can take a long time to do.
DAMN we missed the rounded edges
What are the effects of not doing this?We can still do it on the ports/handles, but we don't have an "overfræser", so is it worth the hard work grinding it down manually?
2.11 Any plywood with minimum 7 ply would be second choice, less than 7 ply should not be considered unless you're on a really tight budget or just simply can't get anything else. The absolute best while still being cost friendly is 9 ply birch plywood. If it matters, I also recommend the filmed version.
Forgot to ask. Can you recommend an place to find birch plywood in filmed version in DK ? Can one paint on top of the filmed plywood version ?
You say that you also recommend the filmed one. I actually think that the only thing that I have been using in the past 3 stereos is the filmed version. It has a super smooth surface which is hard to draw on with a pencil unless you use some sandpapir on it first (and then it's still pretty hard ). I guess that the wood fibres are sealed off though so that rain/moist won't affect it as much as the non filmed version. I need a confirmation on this
I looked at Phaedras pictures before and noticed that his wood was a lot lighter colored. I assume that this is the nonfilmed version. I could also imagine that this version would be a lot more absorbant to paint. Is this true?
The filmed version seems very, very, very rigid. Not like any other type of plywood I have been using. I have not been using the non-filmed version yet, but could be fun to try the difference - especially with drawing on it with a pencil. That has been a P.I.T.A. to do with the filmed one.
Anything you have any experience with?
). I guess that the wood fibres are sealed off though so that rain/moist won't affect it as much as the non filmed version. I need a confirmation on this I looked at Phaedras pictures before and noticed that his wood was a lot lighter colored. I assume that this is the nonfilmed version. I could also imagine that this version would be a lot more absorbant to paint. Is this true?
The filmed version seems very, very, very rigid. Not like any other type of plywood I have been using. I have not been using the non-filmed version yet, but could be fun to try the difference - especially with drawing on it with a pencil. That has been a P.I.T.A. to do with the filmed one.
Anything you have any experience with?
Great thanks. I pressume you mean the edges should be made round with sandpaper or something simmilar right ?
Yeah, or router
Can you recommend another one ? The price was quite good on it.
Haven't found a good replacement yet.
Not sure what you mean. Are there two different compartments in the center ? I thought there was only one. So you recommend putting buttons in one of the venting holes which means covering it up. Is this what you mean ?
It's one compartment. But I was thinking the place of the switches/connector to be on the inside the venting. But you can block one of the top venting holes if needed, or one of the bottom. Or both, but if so then cross block it.
Cool, probably the speaker connectors are the best idea. Shouldn't the speaker connectors be sealed in a way ? If so with what ?
Probably not needed but a dash of non-corrosive silicone will do fine
So when you say 9 ply plywood it's actually 9mm birch plywood right ? If this is correct then it would mess up the cutting instructions before or i have to change them accordingly when using 9mm.
No, I mean 9 ply. That's 9 layers. We're talking only of 12mm plywood here but the number of ply (layers) and material vary.
Look for WISA FORM BIRCH for the filmed version. And WISA BIRCH PREMIUM for the unfilmed version.
Here's a danish supplier http://www.krydsfiner.dk/filmbelagt_glatglat.6
DAMN we missed the rounded edges
We can still do it on the ports/handles, but we don't have an "overfræser", so is it worth the hard work grinding it down manually?
For the port the effect can be quite significant as it's tuned to very high wind velocity so rounding it will have an effect at high volumes. For the bracing holes, that's more religion than anything else. It could/should have an effect of improving midrange performance but if it really does is not something I've actually tested.
You say that you also recommend the filmed one. I actually think that the only thing that I have been using in the past 3 stereos is the filmed version. It has a super smooth surface which is hard to draw on with a pencil unless you use some sandpapir on it first (and then it's still pretty hard
I looked at Phaedras pictures before and noticed that his wood was a lot lighter colored. I assume that this is the nonfilmed version. I could also imagine that this version would be a lot more absorbant to paint. Is this true?
The filmed version seems very, very, very rigid. Not like any other type of plywood I have been using. I have not been using the non-filmed version yet, but could be fun to try the difference - especially with drawing on it with a pencil. That has been a P.I.T.A. to do with the filmed one.
Anything you have any experience with?
I actually recommend the filmed WISA FORM BIRCH as the first choice. The reason is that it is especially made for maximum rigidity. Other plywood are not anywhere near as rigid in relation to it's thickness and number of ply. Filmed birch plywood is the best for this use. No doubt about that even if it is a PITA to work with.
Last edited:
You can paint directly the filmed surface but it's far better to lightly sand it first. Use a primer that can bind solidly on the phenolic resin coating which basically means boat primer for glassfibre/carbonfibre boats. It's the only primer that is strong enough to last. Note that it's also pretty unhealthy stuff, so do it outside.
You can get extra strong boat primers that eliminates the need for sanding by instead chemically bonding with the coating resin on the plywood.
You can get extra strong boat primers that eliminates the need for sanding by instead chemically bonding with the coating resin on the plywood.
Last edited:
I guess you are talking about "hæftegrunder"?...like this one
Absolutely not. That's no way near strong enough if you want it professionally done. You're looking at wood paint. You have to look at boat paint. It's expensive, it's enviromentally and health hazardous but it's the best.
Something like this: http://www.hempel.com/internet/hempelcomcopy3006.nsf/vALLBYDOCID2/57700AF7A0C6CE5EC12568E900462BDB/$file/PDS_45551.pdf
- Home
- Amplifiers
- Class D
- The Boominator - another stab at the ultimate party machine